HANNAH TYLER
  • Blog
  • Shop Our Homes
    • Lakeshore New Build
    • Holland Cottage
    • Cabin
    • 30a Project
    • Ada House Flip
    • EGR Condo Flip
    • GR Condo Flip
  • SHOP OUR FAVES
    • Furniture >
      • Dressers
      • Coffee Tables
      • Accent Chairs
      • Dining Tables
      • Dining Chairs
      • Sofas
      • Beds
      • Nightstands
      • Desks
      • Outdoor
    • Home Decor >
      • Rugs
      • Pillows
      • Books
      • Wall Art
      • Lighting
      • Plumbing
      • Tile
      • Blankets
      • Baskets
      • Dishware
      • Mirrors
      • Plants
      • Home Accessories
    • GIFTS
    • HANNAH'S CLOSET
    • TY'S CLOSET
    • Brooks' Closet
    • Baby Things
    • Beauty
  • HOME DESIGN
  • About
  • Newsletter

IKEA VANITY HACK

6/14/2019

12 Comments

 
Picture
Floating vanities allow for a continuous floor, making a bathroom feel larger. When designing our bathroom renovations, I fell for IKEA's floating vanities. They are available in a myriad of colors, including a gorgeous light oak. Beyond a well rounded collection, you can't beat the PRICE! Although, we had to get creative when installing the under-mount sinks.
Picture

Here is the vanity we chose for our master bathroom. Here is the one we selected for our guest bath. ​We've lived with these vanities for 6 months now, and we couldn't love them more. The drawers slide beautifully and offer tons of storage. 

Picture

​To make these vanities appear high end, we decided we wanted to purchase a quartz remnant with under-mount sinks. The IKEA vanities are not designed for standard under-mount sink plumbing.

​You'll notice we opted for one sink versus two; we did so because I wanted plenty of counter space for my makeup and hair tools (who else is sick of balancing a curling iron on a skinny countertop edge, watching it fall into the sink every few minutes). We also have ample storage in the drawers to the left of the sink as the top drawer is not overwhelmed by plumbing.
Picture
Picture

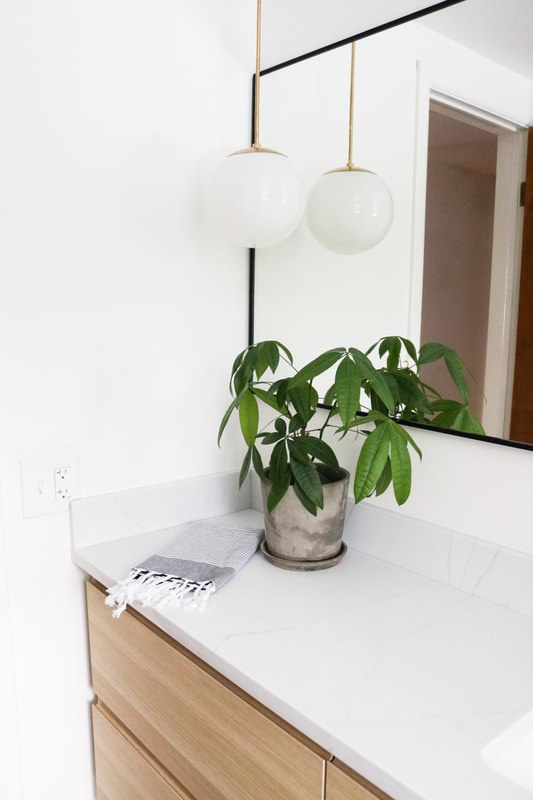
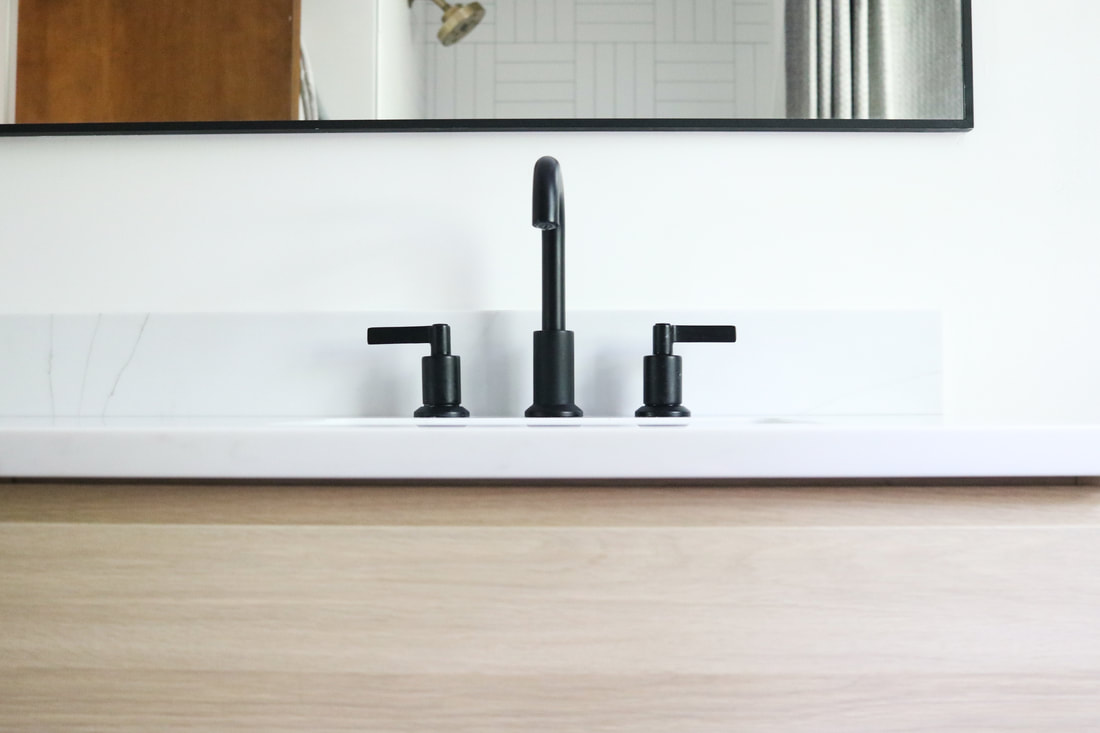
​IKEA's prefab sinks are incredibly shallow; which created another obstacle when it came to buying and installing our own. In order to make room for the plumbing, we had to cut the top drawer. 

See image below. (The drawer underneath did not need to be cut, and functions as standard!) 

Picture
Picture
Picture
For the guest bathroom, we decided to go with a traditional white. Though, after installation, we decided we will definitely be upgrading the hardware in the near future. We always love a good Ikea hack! For where there's a will, there's a community to teach you the way :) 
-HJJ
12 Comments
Cagney
4/17/2020 06:23:07 am

Did you replace the counter top with marble or quartz in the master? Or some ikea hack that I’m not aware of to their counter?! It looks so good!

Reply
Roxy
4/27/2020 08:23:19 pm

Where did you find the mirror? Love how this turned out!

Reply
monique
5/20/2020 10:53:59 am

Hi there, this looks great and exactly what I'm looking to do. Is the Godmorgon cabinet two side by side?

Reply
Ashley
7/2/2020 08:01:12 pm

Please share your under mount sink source!

Reply
Lyn
8/17/2021 10:49:02 am

Please share your under mount sink source. Thanks!

Reply
Monte
5/1/2021 10:24:46 am

Did you use a 2 or 3 cm countertop?

Reply
Chase Moore
12/8/2021 06:58:30 pm

Hello, love the hack! Doing a similar style but having a hard time finding an undermount sink. If you please, would you share the model that you used for this post? Thank you so much!

Chase

Reply
Dorrie
12/9/2021 09:37:27 am

I am trying to do something similar and would also love to know what sink you ended up using. Also the fixture, since I am wondering if there are any issues with the drain assembly etc... Your fixture looks great.

Thanks!

Dorrie

Reply
ceci
6/6/2022 04:49:05 pm

could you share which sinks did you use?

Reply
Shawn L Nutt
4/13/2023 08:50:31 am

What sink did you use?

Reply
Dani Mac
5/20/2023 05:25:30 pm

Shawn - if you look back at this - I wanted to let you know that there is a post on Houzz by someone who did this - and lists all of the parts she used (including a different drain assembly) in order to not have to cut her drawers.

Also, she had the countertop fabricator add an extra long mitered edge to the front of the countertop in order to add extra space for the sink to fit. I love floating bathroom vanities that have a thick looking countertop.

She also lists the exact sinks that she used - she found shallow undermount sinks.

Also, right before I read this post, I found a post by Jenna Sue Design - she wrote an IKEA Godmorgan vanity hack using real wood door fronts from The Cabinet Face (a European brushed oak - solid) + had them also make a matching shelf to go under the vanity.

While the shelf below tha vanity looks like it’s floating, it actually isn’t - she built a base out of 2x4s that is completely hidden back from the edge of the shelf so it still looks like it’s floating.

She also shows how they added extra support for the weight of the countertop + undermount sinks (the woman on Houzz actually added metal L brackets into studs that hold the entire weight of her countertop/sinks - instead of trusting the IKEA vanity to do it.)

Jenna Sue Designs used two of the 39” vanities to fill the alcove in her bathroom - I also purchased two of the 39” ones for mine. My plan is to use small filler pieces to fill out the couple extra inches on each side to fit vanity to the side walls. My idea of how to accomplish this was basically the same as how Jenna Sue Designs did it on one side of her vanity - she did it differently on the second side which was apparently a little bit quicker.

Sorry for the long post - just wanted to try to help you out!

I am trying to decide if I should add a small filler piece at the top of the vanity also - that way the miter for my countertop could be a little smaller = maybe save a little money + make it easier for my plumber. I am now trying to decide whether I should make a couple small false drawers at the top - that would give me plenty of space for an undermount sink.

Reply
Dani
5/20/2023 05:26:12 pm

Shawn - if you look back at this - I wanted to let you know that there is a post on Houzz by someone who did this - and lists all of the parts she used (including a different drain assembly) in order to not have to cut her drawers.

Also, she had the countertop fabricator add an extra long mitered edge to the front of the countertop in order to add extra space for the sink to fit. I love floating bathroom vanities that have a thick looking countertop.

She also lists the exact sinks that she used - she found shallow undermount sinks.

Also, right before I read this post, I found a post by Jenna Sue Design - she wrote an IKEA Godmorgan vanity hack using real wood door fronts from The Cabinet Face (a European brushed oak - solid) + had them also make a matching shelf to go under the vanity.

While the shelf below tha vanity looks like it’s floating, it actually isn’t - she built a base out of 2x4s that is completely hidden back from the edge of the shelf so it still looks like it’s floating.

She also shows how they added extra support for the weight of the countertop + undermount sinks (the woman on Houzz actually added metal L brackets into studs that hold the entire weight of her countertop/sinks - instead of trusting the IKEA vanity to do it.)

Jenna Sue Designs used two of the 39” vanities to fill the alcove in her bathroom - I also purchased two of the 39” ones for mine. My plan is to use small filler pieces to fill out the couple extra inches on each side to fit vanity to the side walls. My idea of how to accomplish this was basically the same as how Jenna Sue Designs did it on one side of her vanity - she did it differently on the second side which was apparently a little bit quicker.

Sorry for the long post - just wanted to try to help you out!

I am trying to decide if I should add a small filler piece at the top of the vanity also - that way the miter for my countertop could be a little smaller = maybe save a little money + make it easier for my plumber. I am now trying to decide whether I should make a couple small false drawers at the top - that would give me plenty of space for an undermount sink.

Reply


Leave a Reply.

Proudly powered by Weebly
  • Blog
  • Shop Our Homes
    • Lakeshore New Build
    • Holland Cottage
    • Cabin
    • 30a Project
    • Ada House Flip
    • EGR Condo Flip
    • GR Condo Flip
  • SHOP OUR FAVES
    • Furniture >
      • Dressers
      • Coffee Tables
      • Accent Chairs
      • Dining Tables
      • Dining Chairs
      • Sofas
      • Beds
      • Nightstands
      • Desks
      • Outdoor
    • Home Decor >
      • Rugs
      • Pillows
      • Books
      • Wall Art
      • Lighting
      • Plumbing
      • Tile
      • Blankets
      • Baskets
      • Dishware
      • Mirrors
      • Plants
      • Home Accessories
    • GIFTS
    • HANNAH'S CLOSET
    • TY'S CLOSET
    • Brooks' Closet
    • Baby Things
    • Beauty
  • HOME DESIGN
  • About
  • Newsletter